
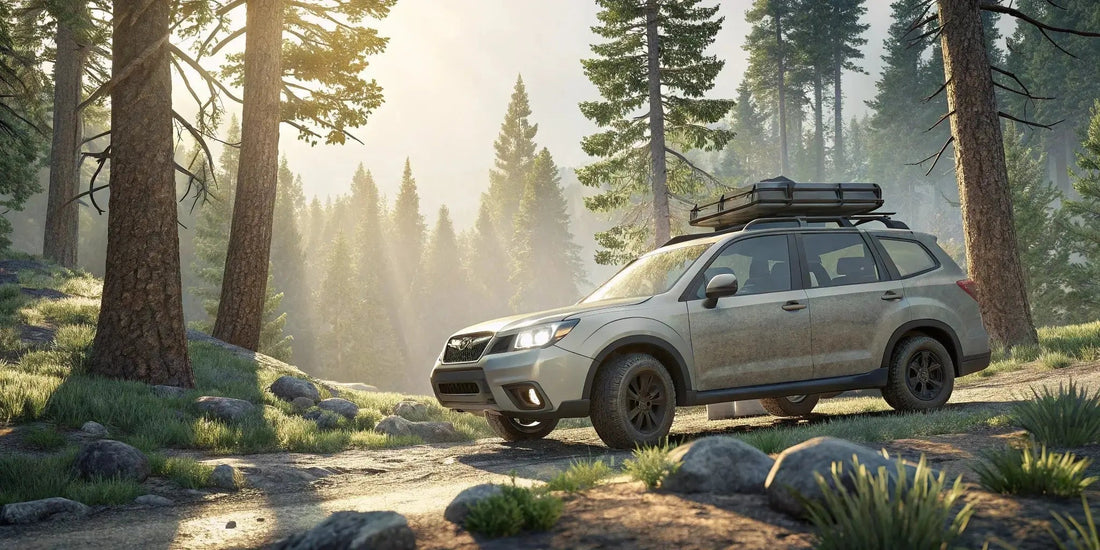
DIY Lift Kit Installation: Your Complete Guide
The moment your daily driver truly becomes an adventure rig often happens on a set of jack stands. For your Subaru Forester, the lift kit installation is that pivotal point of transformation. It’s about more than just adding a few inches of height. It’s about the confidence to turn down that unmarked trail and the capability to reach a remote campsite. This guide will lead you through the entire process, ensuring your Forester’s transformation is built on a foundation of quality work and ready for any terrain.
Key Takeaways
- Focus on a Complete Suspension Solution: Look beyond simple lift height and choose a kit with components like subframe spacers that correct suspension geometry. This prevents premature wear on parts like CV joints and ensures your Forester's long-term health and reliability on the trail.
- Prioritize Torque Specs and Alignment: A safe installation isn't finished until every bolt is tightened to the manufacturer's exact torque specification. Follow this immediately with a professional wheel alignment to ensure proper handling, prevent uneven tire wear, and protect your investment.
- Adopt a Proactive Maintenance Routine: Your lifted suspension requires regular check-ups. After off-road trips, inspect all hardware for tightness and check components like shocks and bushings for wear to catch small issues before they become major problems.
Why Lift Your Forester Wilderness?
Your Subaru Forester Wilderness is already a capable machine right from the factory, built to handle more than just paved roads. But if you're looking to push its limits and truly explore the backcountry, a lift kit is one of the most effective upgrades you can make. Lifting your Forester isn't just about achieving a more aggressive stance—it's about gaining real-world performance and confidence on the trail. By raising the suspension, you fundamentally change how your vehicle interacts with rugged terrain, giving you the ability to go places a stock vehicle simply can't.
This modification provides tangible benefits that allow you to tackle more challenging obstacles, from rocky paths and deep ruts to steep inclines. It’s the foundation for building a truly adventure-ready rig. A quality lift kit enhances the vehicle's natural strengths, giving you the extra clearance and capability needed to go further. Whether you're planning a weekend camping trip or a serious overlanding expedition, lifting your Forester is the first step toward transforming it into the ultimate off-road companion. Explore our overlanding solutions to see how we can help you build your dream setup.
Get Ready for Serious Off-Roading
While a lift kit’s most obvious benefit is added height, a well-designed system does so much more. It's about enhancing the entire suspension for better performance when the pavement ends. A lift gives your Forester more height, but upgraded suspension components provide better control, more grip, and a smoother ride over rough ground. This means you can maintain stability and comfort while navigating uneven surfaces, washboard roads, and rocky trails. By improving how your suspension absorbs impacts and keeps your tires planted, you gain the confidence to handle more demanding off-road situations with ease. These performance parts are engineered to work together, giving you a cohesive and capable system.
Easily Clear Rocks and Ruts
One of the most practical advantages of a lift kit is the immediate increase in ground clearance. Raising your Forester higher off the ground is essential for serious off-road driving. This extra space between the undercarriage and the trail means you can clear rocks, logs, and deep ruts without worrying about causing expensive damage to vital components like your oil pan, exhaust, or suspension parts. More ground clearance directly translates to more freedom on the trail, allowing you to choose more aggressive lines and explore terrain that would be inaccessible to a stock vehicle. It’s a simple change that makes a massive difference in your vehicle's trail-worthiness and your peace of mind. Check out our Subaru Forester upgrades to find the right lift for your adventures.
Climb Steeper Hills Without Scraping
Beyond simple ground clearance, a lift kit significantly improves your Forester’s approach and departure angles. Think of the approach angle as the steepest hill you can drive up without your front bumper hitting the slope. The departure angle is the same concept for the rear bumper when you’re coming down the other side. A lift kit increases these angles, allowing you to tackle steeper inclines and declines without scraping or damaging your vehicle. This is a critical advantage on technical trails with sharp elevation changes. Better angles mean you can get over obstacles more easily, turning your Forester into a more nimble and capable machine for any overlanding solutions you have in mind.
Your Pre-Installation Checklist: Tools & Prep
Getting your workspace and tools in order before you even touch a bolt is the secret to a smooth installation. Think of it as your pre-flight check. Taking a little time to prepare now will save you from frustrating mid-project runs to the auto parts store. It ensures you can work safely and efficiently, turning a potentially long day into a rewarding afternoon project. We'll walk through exactly what you need to have on hand, from the right sockets to the proper safety gear, so you can get your Forester lifted and ready for the trail with confidence.
Your Essential Tool Checklist
You don’t need a professional-grade garage, but having the right tools is non-negotiable. You’ll want a complete metric socket and wrench set, as suspension components are all metric. A sturdy floor jack and a pair of reliable jack stands are crucial for safely getting your Forester off the ground. You'll also need a breaker bar for stubborn bolts and a good torque wrench to tighten everything to the correct specifications—this is key for safety and performance. A dead blow hammer can also be a lifesaver for persuading parts to separate without damaging them.
Safety Gear You Can't Skip
Let’s talk safety. It’s the most important part of any DIY project. At a minimum, you should always wear safety glasses to protect your eyes from dirt, rust, and flying debris. A good pair of mechanic's gloves will save your knuckles and keep your hands clean. Beyond personal gear, the most critical safety step is to never work under a vehicle supported only by a jack. Always use jack stands rated for your vehicle's weight. Before you start, take a few minutes to read through the lift kit’s installation manual to understand any specific warnings or steps that require extra caution.
How to Set Up Your Workspace
A clean, well-lit, and organized workspace makes all the difference. You’ll be working on both sides of the car, so make sure you have plenty of room to move around on a flat, level surface like a garage floor or driveway. Lay out your tools on a workbench or a rolling cart so you can grab what you need without searching. Plan on the installation taking a few hours—most kits can be installed in about half a day. It’s also a good idea to have some penetrating oil on hand for any rusty bolts, which are common on suspension parts.
What to Inspect on Your Forester Before You Begin
Before you lift the vehicle, do a quick inspection. Look over the suspension components you’ll be working on. Check for any pre-existing damage or heavily rusted bolts, especially the rear subframe bolts, as these can sometimes be tricky. Spraying any stubborn-looking bolts with penetrating oil the night before can make them much easier to remove. This simple step also gives you a chance to familiarize yourself with the parts you'll be replacing or modifying. It’s much better to identify potential issues on the ground than when the car is on jack stands.
How to Choose the Right Lift Kit
Picking the right lift kit for your Forester Wilderness is about more than just adding height; it’s about matching your ambitions to the right equipment. Whether you’re planning serious rock crawling or just need a little extra clearance for rugged fire roads, the kit you choose will define your vehicle’s capability. The market is full of options, from simple spacer lifts that raise the body to full suspension systems that replace key components for improved articulation and performance.
Your goal is to find a balance that suits your driving style and budget. A well-engineered lift kit will not only give you the ground clearance you need but will also maintain your Subaru’s handling and reliability. Before you start shopping, think about how you’ll be using your Forester most of the time. This will help you decide which features are must-haves and which are just nice-to-haves. Investing in the right setup from the start ensures your overlanding solutions are built on a solid foundation, ready for any adventure you have in mind.
Understanding the Different Types of Lift Kits
When you start looking for a lift, you'll quickly find there are a few different approaches to raising your Forester. The main categories are suspension lifts, body lifts, and leveling kits. Each one works differently and is designed for a specific purpose. Understanding these differences is the key to choosing a kit that aligns with your goals, whether you're aiming for maximum trail capability or a more balanced, aggressive look. Let's break down what each type does so you can make an informed decision for your build.
Suspension Lift Kits
A suspension lift is the most comprehensive and effective way to prepare your Forester for serious off-road duty. This type of kit raises the vehicle by modifying or replacing suspension components like struts, springs, and control arms. The primary goal is to increase ground clearance and allow for larger tires, which dramatically improves your ability to handle challenging terrain. Unlike simpler methods, a quality suspension lift, like the ones we design at Crawford Performance, often includes components like subframe spacers to correct suspension geometry. This ensures your CV axles operate at safe angles and preserves your vehicle's handling characteristics and long-term reliability, making it the go-to choice for dedicated overlanding solutions.
Body Lift Kits
You might hear about body lifts, which traditionally use spacers to raise a vehicle's body off its frame. However, this method doesn't apply to the Subaru Forester because it has a unibody construction, meaning the body and frame are a single unit. The closest equivalent for a Forester is a spacer lift kit, which is technically a type of suspension lift. These kits use spacers that are installed on top of your factory struts to provide lift. While they are a cost-effective way to gain height and fit larger tires, they don't typically improve suspension travel or performance. For this reason, they are best suited for light trail use or achieving a more aggressive look without altering the factory ride quality too much.
Leveling Kits
A leveling kit is designed to solve a specific aesthetic issue: the factory rake. Most trucks and SUVs, including the Forester, are built with the rear sitting slightly higher than the front. A leveling kit adds a small amount of lift—usually one to two inches—to the front suspension only, bringing it level with the rear. This creates a more balanced stance and can provide a bit of extra clearance for the front bumper. While a leveling kit isn't intended for major off-road performance gains, it's a great option if your primary goal is to improve your Forester's appearance or compensate for the added weight of a heavy-duty front bumper or winch.
Comparing the Best Forester Lift Kits
When you start looking at lift kits, you’ll see a few names pop up repeatedly because they’ve earned a reputation for quality. Brands like LP Aventure, RalliTEK, and IRONMAN 4X4 are popular in the Subaru community for good reason. LP Aventure specializes in adventure-focused Subaru builds and offers kits designed to maintain factory alignment. RalliTEK is known for its budget-friendly and easy-to-install spacer lifts, making them a great choice for DIYers. IRONMAN 4X4 brings its extensive off-road experience to the table with comprehensive suspension systems. Researching these brands is a great starting point for finding quality Subaru Forester upgrades.
What to Look for in a Lift Kit
Beyond the brand name, focus on the specific features of the kit. The most obvious benefit is increased ground clearance, which is essential for clearing obstacles on the trail. However, a quality kit does more than just lift the vehicle. Look for designs that include subframe spacers and other components to maintain proper suspension geometry and CV joint angles, which prevents premature wear and tear. You’ll also want to consider the materials—are the components made from durable, powder-coated steel to resist corrosion? These details are what separate reliable performance parts from those that will cause problems later.
Comparing Lift Kit Costs
Lift kit prices can range from a few hundred dollars to several thousand, and it’s important to understand what you’re getting for your money. A basic spacer lift kit, like one from RalliTEK, might cost around $300 and is a great entry-level option. A more comprehensive kit with new springs and struts, like those from IRONMAN 4X4, will be more expensive but offers a significant improvement in off-road performance. When comparing prices, look at the complete package. A cheaper kit might require you to purchase other components separately, so always factor in the total cost for a complete and safe installation.
Will This Lift Kit Fit Your Forester?
This might seem obvious, but it’s one of the most critical steps. Always double-check that the lift kit is designed for your Forester’s specific year and trim level. The Forester Wilderness has a slightly different factory suspension than other trims, so a kit made for a standard Forester might not fit perfectly. Manufacturers like LP Aventure and RalliTEK clearly list the model years their kits are compatible with, so read the product descriptions carefully. If you’re ever unsure, don’t hesitate to contact the manufacturer directly. Ensuring compatibility from the start will save you from major headaches during installation, whether you're working on a Forester or looking for Subaru Crosstrek upgrades.
Other Important Considerations
Choosing the right lift kit goes beyond just picking a brand or a specific height. To make a smart investment, you need to think about how the modification will integrate with your vehicle, comply with local laws, and affect its long-term value. These practical details are just as important as the performance gains you’ll see on the trail. Taking the time to consider these factors ensures your lifted Forester is not only more capable but also safe, legal, and a joy to own for years to come.
Vehicle Compatibility and Weight Capacity
We’ve already touched on making sure a kit is compatible with your Forester’s specific model year and trim, but it’s a point worth repeating. Beyond fitment, you also need to consider your vehicle’s total weight. If you’re planning to add heavy gear like steel bumpers, a winch, or a rooftop tent, a standard lift kit might not be enough. Many suspension systems are designed for a specific weight range, and overloading them can lead to poor handling and premature wear. Before you buy, think about your complete build and choose a kit with a spring rate that can support your fully loaded overlanding solutions setup.
Local Laws and Regulations
Before you install any lift kit, it’s essential to check your local and state laws regarding vehicle modifications. Many states have specific regulations that limit how high you can lift your vehicle, often dictating maximum bumper, frame, and headlight heights. Exceeding these limits can lead to hefty fines, failed safety inspections, or even a mandate to return your vehicle to its stock height. A quick search for your state’s vehicle code or resources from organizations like the SEMA Action Network can provide the information you need. Staying compliant ensures your off-road rig remains perfectly legal for on-road driving.
Additional Benefits: Visibility and Resale Value
While the primary goal of a lift kit is improved off-road capability, there are other perks. The higher seating position gives you a commanding view of the road, making it easier to see over traffic and spot obstacles on the trail. Furthermore, a well-executed lift using quality components can actually increase your Forester’s resale value, especially among fellow enthusiasts. A thoughtfully modified Subaru that’s ready for adventure is often more desirable than a stock one. Using reputable performance parts and keeping detailed records of the installation shows potential buyers that the work was done right, making your vehicle a standout on the market.
What Does a Lift Kit Installation Cost?
Figuring out the budget for your lift kit is a key part of the planning process. The total cost isn't just the sticker price of the kit; it also includes installation labor and a few other expenses you might not have considered. Breaking it down helps you get a clear picture of the investment and decide on the best path forward for your build. Whether you're a seasoned DIYer or prefer to leave it to the experts, knowing the full financial scope will help you plan your project without any surprises.
Let's walk through the three main cost components: the kit itself, installation, and those extra, easy-to-forget expenses.
Understanding the Kit's Price Tag
The lift kit is your biggest initial expense, and prices vary by brand, lift height, and included components. For a quality 2-inch lift kit, expect prices to start around $750. More comprehensive kits with extras like jack spacers or powder coating can push the price closer to $900 or more. When shopping, check what each kit contains. Some include all hardware, while others may require you to buy small parts separately. This is the foundation of your build, so choosing from trusted overlanding solutions is a smart move.
DIY vs. Pro Install: A Cost Comparison
This is where you have the most control over your budget. A DIY installation can save you hundreds in labor if you’re comfortable with a wrench. Many modern kits are designed for installation with basic hand tools, making it a manageable weekend project for someone with intermediate mechanical skills. If you’d rather have a professional handle it, factor in labor charges. A typical installation takes about four hours, so you can estimate the cost using your local shop's hourly rate. Professional installation offers peace of mind, similar to trusting an expert with engine tuning services—sometimes, a pro is the best way to go.
Estimating Your Installation Time
Beyond the financial cost, time is another crucial resource to budget for your lift kit installation. Whether you're tackling the job yourself or handing the keys to a professional, having a realistic timeline is essential for a stress-free project. A proper installation can't be rushed, as it involves critical suspension components that directly affect your Forester's safety and performance. Setting aside enough time ensures you can work methodically, double-check your work, and handle any unexpected hiccups without feeling pressured. This is especially true for a DIY project, where patience and attention to detail are your best tools.
Professional vs. DIY Timelines
If you take your Forester to a professional shop, you can expect the installation to take between four to eight hours. Experienced technicians have the right tools, a vehicle lift, and have likely performed the job many times before, which allows them to work efficiently. For a DIY installation, a good rule of thumb is to plan for at least double that time. A more complex suspension lift could take a full weekend, from 5 to 15 hours, while a simpler leveling kit might be done in an afternoon. This extra time accounts for the learning curve, working with jack stands instead of a lift, and troubleshooting any stubborn bolts. To help streamline the process, make sure you prepare your workspace and tools before you begin.
Don't Forget These Other Expenses
Beyond the kit and installation, a few other costs can pop up. First, you’ll need a professional wheel alignment after the lift is installed. This step is non-negotiable, as lifting your Forester changes its suspension geometry, and proper alignment is crucial for safety and preventing uneven tire wear. If you're doing the installation yourself, make sure you have the right tools: a full set of metric sockets and wrenches, a torque wrench that can handle up to 200 ft-lbs, a dead blow hammer, and sturdy jack stands. If you don't own these, you'll need to buy or rent them. Finally, you might be inspired to upgrade other performance parts once your Forester is lifted, so it's good to have room in your budget.
Is a DIY Lift Kit Installation Right for You?
Deciding whether to install a lift kit yourself or hand the keys to a professional is a big decision. A DIY install can be an incredibly rewarding project that saves you money and deepens your connection with your Forester. However, it requires a certain level of mechanical skill, the right tools, and a clear understanding of the risks involved. This isn't just about bolting on parts; it's about correctly modifying your vehicle's suspension, a system critical to its safety and performance. Before you clear out the garage, let's walk through an honest assessment to help you determine if tackling this project yourself is the right move for you.
Assessing Your Skill Level
First, be realistic about your mechanical experience. If your toolset is mostly used for household fixes and your main auto repair achievement is changing a tire, installing a lift kit might be too ambitious. As many experienced builders will tell you, this project is not ideal for a complete beginner. You should be comfortable working with suspension components, understand the importance of torque specifications, and be able to troubleshoot if you hit a snag. If you’ve successfully handled jobs like replacing brake pads or swapping out shocks, you likely have the foundational skills needed. But if this would be your first major project, it’s wise to reconsider or enlist an experienced friend to help.
Understanding the Risks of a DIY Install
While the satisfaction of a successful DIY install is huge, the consequences of a poor one can be serious. An improperly installed lift kit can lead to a host of problems, from poor handling and accelerated tire wear to catastrophic failure of suspension components. You could damage your vehicle over time by putting excessive strain on parts like CV joints and ball joints. It’s crucial to recognize that you are modifying a core system of your vehicle. Taking shortcuts or making mistakes here can compromise your Forester's safety and reliability on and off the road, potentially leading to far more expensive repairs down the line than the initial cost of a professional installation.
Safety Concerns
Your personal safety is the absolute top priority during any installation. Working under a vehicle that weighs over 3,500 pounds is inherently dangerous if you don't take the proper precautions. Never rely on a jack alone to support the vehicle; always use jack stands that are properly rated for your Forester's weight. Before you even loosen a bolt, read the lift kit’s installation manual thoroughly to understand any specific warnings or steps that require extra care. Wearing safety glasses and gloves is non-negotiable. A moment of carelessness can lead to serious injury, so it’s essential to stay focused and follow every safety protocol without exception.
Potential for Vehicle Downtime
Another practical factor to consider is vehicle downtime. If your Forester Wilderness is your daily driver, a DIY project that takes longer than expected can leave you without transportation. A seized bolt, a missing tool, or an unexpected complication can easily turn a half-day project into a multi-day ordeal. As one DIYer noted, you could get stuck without transportation if the job hits a snag. Make sure you have a backup plan or can afford to have your vehicle off the road for a few days, just in case. Rushing the job to get back on the road is a recipe for mistakes.
When a Professional Check-Up is a Good Idea
Even if you successfully complete the DIY installation, your work isn't quite finished. After installing any lift kit, it is absolutely essential to get a professional wheel alignment. Lifting your Forester alters its suspension geometry, and without a proper alignment, you’ll experience poor handling, pulling to one side, and rapid, uneven tire wear. This isn't a step you can skip or eyeball in your garage. Taking your vehicle to a qualified shop ensures that your camber, caster, and toe are all set back to the correct specifications, protecting your investment in both the lift kit and your tires. It’s the final, critical step to ensure your newly lifted Forester is safe and ready for the road.
How to Install Your Lift Kit: A Step-by-Step Guide
Alright, you’ve picked out the perfect lift kit and cleared your weekend. Now comes the fun part: the installation. While it might seem like a big job, breaking it down into manageable steps makes it totally doable. This guide will walk you through the process, from getting your workspace ready to making those final tweaks. Remember, taking your time and doing it right is key to a successful install that will have you hitting the trails with confidence. Let's get started.

Step 1: Start with a Safe Setup
Before you even think about loosening a bolt, let's talk about safety. This is non-negotiable. Make sure your Forester is on a level surface, the parking brake is on, and you've chocked the wheels. Use quality jack stands—never rely on a jack alone to support the vehicle. It's also a good idea to have a fire extinguisher and a first-aid kit nearby. As the official Subaru Wilderness Install Guide points out, paying attention to cautions is essential to avoid damaging your vehicle or, more importantly, yourself. Double-check that you have all the right tools before you start so you aren't scrambling mid-project.
Disconnect the Battery
This is a quick but critical step that protects your Forester’s sensitive electronics. Before you start the heavy lifting, always unhook the negative battery cable. This simple action prevents any risk of electrical shorts while you're working on the suspension, safeguarding your vehicle's computer and other systems from accidental damage. All you need is a wrench to loosen the nut on the negative terminal, then you can slide the cable off and tuck it to the side where it can't make contact. It takes less than a minute and provides essential peace of mind for the rest of the installation.
Loosen Lug Nuts on the Ground
Here’s a pro tip that will save you a lot of effort: break the lug nuts loose before you lift the vehicle. With the full weight of the Forester on its wheels, you can use your body weight and a breaker bar to get the nuts started without the wheel spinning in the air. This is especially helpful if you don't have an impact wrench. Just give each lug nut about a quarter-turn to loosen it—don't remove them completely. This makes taking the wheels off much easier and safer once the car is securely on jack stands.
Step 2: Removing Your Stock Suspension
With your Forester safely secured, it's time to start removing the stock suspension components. This is where patience really pays off. You'll be working on things like the subframe, support brackets, and sway bar mounts. Depending on your experience, this can take some time, but it's a straightforward process. One owner on an Ascent forum noted it took about 30 minutes just to drop the subframe and install the spacers. Keep all your nuts and bolts organized in labeled bags or containers. This will save you a massive headache when it's time to put everything back together. Trust me on this one.
Step 3: Install Your New Lift Kit
Now for the exciting part—installing your new lift kit. With the old components out of the way, you can start fitting the new parts. Most modern lift kits, like many of the overlanding solutions available, are designed with the home mechanic in mind. The installation is often a direct, bolt-on process that doesn't require any cutting or welding. For example, some kits are specifically marketed as being an "Ez-Install Lift Kit" for DIY enthusiasts. Follow the manufacturer's instructions to the letter, installing each spacer and bracket in the correct order.
Be Prepared for Permanent Modifications
Approach this project knowing that installing a lift kit is a permanent modification. Even though most modern kits are bolt-on and don't require cutting your vehicle's frame, the changes to your suspension geometry are significant and not easily reversed. This isn't like swapping out floor mats; you're fundamentally altering how your Forester was engineered to perform from the factory. You might also need to make other irreversible changes, like trimming plastic fender liners to prevent tire rub if you upgrade to larger tires. This commitment is a key part of transforming your vehicle into a more capable off-road machine with high-quality performance parts, so make sure you're ready for the long-term changes before you begin.
Step 4: How to Torque Bolts Correctly
This step is critical and often overlooked. Once all the lift kit components are in place, you need to tighten every nut and bolt to the manufacturer's specified torque settings. Don't just guess or tighten until it 'feels right.' Using a reliable torque wrench is essential for safety and performance. As one DIYer on Reddit mentioned, you'll need a torque wrench that can handle the job, sometimes up to 200 ft-lbs. Improperly torqued bolts can lead to suspension failure, weird noises, or uneven tire wear down the road. Take the time to look up the specs and do it right.
The Importance of Torquing Under Load
Here’s a pro tip that makes a huge difference: you need to torque your suspension bolts while the vehicle is “under load.” This simply means the full weight of your Forester should be resting on its wheels, not hanging in the air on jack stands. Suspension bushings are designed to flex from a neutral, resting position. If you tighten the bolts while the suspension is drooping, you lock the bushings in an unnatural, twisted state. Once you lower the car, those bushings will be under constant tension, leading to a stiff ride and causing them to wear out incredibly fast. A safe installation isn't complete until every bolt is tightened correctly, which includes doing it under load to protect your investment and ensure your performance parts function as intended. To do this, loosely tighten the bolts, lower your Forester onto ramps or blocks, and then use your torque wrench for the final tightening.
Step 5: Final Checks and Adjustments
Once everything is torqued down, lower your Forester back to the ground. But you're not quite done yet. You'll need to make some final adjustments. It's important to settle the suspension before tightening certain bolts, particularly those on control arms with rubber bushings. As discussed on a Subaru Forester forum, tightening these bolts while the suspension is hanging can cause the bushings to bind and wear out prematurely. Bounce the vehicle a few times to let everything settle into its new position, then do a final check on all your bolts. The next crucial step is getting a professional alignment.
Solving Common Lift Kit Installation Problems
Even with the best preparation, you can hit a snag during a lift kit installation. It happens to everyone. The key is not to panic or force anything. Most common issues have straightforward solutions if you approach them with a bit of patience. Think of these challenges as part of the learning process. From stubborn bolts to tricky alignment, getting through these hurdles is what makes the final result so rewarding. This guide will walk you through a few of the most common problems you might face and give you the steps to work through them. Remember, taking your time to solve a problem correctly now will save you from bigger headaches down the road. Before you reach for a bigger hammer, take a deep breath and let’s figure this out together. We'll cover everything from making sure your alignment is on point from the start to dealing with those frustrating captive nuts that just don't want to cooperate. We'll also talk about recognizing when it's time to step back and let a professional take over. The goal is to get your Forester lifted safely and correctly, so you can enjoy the benefits on the trail without worrying about installation mistakes. A successful DIY project is about knowing how to handle the unexpected, and these tips will give you the confidence to tackle any bumps in the road—both in your garage and out on the trail.
What to Do About Alignment Issues
Proper alignment starts the moment you begin installing the new components, not just when you take it to the shop afterward. If parts are misaligned during the install, it can put stress on your suspension and make the final professional alignment much more difficult. As one enthusiast noted, it's critical to make sure the suspension is seated correctly as you go. Take the time to ensure every bolt lines up smoothly and that components aren't being forced into place. A good tip is to leave the bolts slightly loose until all parts are installed, then tighten everything to spec. This allows for small adjustments and ensures everything settles into its natural position. Getting this right is key to maximizing your Forester upgrades.
How to Correct Bad CV Joint Angles
Lifting your Forester changes your suspension geometry, which can put your Constant Velocity (CV) joints at a steeper angle. This is especially true for spacer lifts. Over time, an aggressive angle can cause premature wear and lead to that dreaded clicking sound during turns. One user on a forum pointed out that 2-inch top hat spacer lifts are known for "eating CV joints," a problem that gets worse with any alignment issues. High-quality lift kits are engineered to correct this, often including subframe spacers or other components to keep your CV angles within a safe range. This is a major reason why investing in a well-designed kit is essential for your vehicle's long-term health and your overlanding solutions.
Tips for Dealing with Stubborn Nuts and Bolts
There’s nothing more frustrating than a bolt that just won’t budge. You’ll likely encounter this with the captive nuts inside the frame, especially on the rear suspension arms. Be careful here. As one DIYer warned, "make sure the bolts in the rear for the arms don't break the captive nut in the frame free." If that happens, the nut will just spin inside the frame, and you’ll have a real project on your hands. To avoid this, soak the bolts in penetrating oil for a few hours (or even overnight) before you start. Use slow, steady force with a breaker bar instead of going straight for the impact wrench. A little patience here can prevent a major setback.
When to Call a Professional
There’s no shame in knowing when to call for backup. If you’ve stripped a bolt, can’t get the alignment close, or feel like you’re in over your head, stepping back is the smartest move. Continuing to force parts can cause damage that leads to more expensive repairs. A professional mechanic has the experience and specialized tools to handle tricky situations safely and efficiently. Think of it as an investment in your safety and the performance of your vehicle. If you're facing a challenge that seems too big, reaching out for expert tuning and precision services will get you back on the road (or trail) with confidence.
What to Do After Your Lift Kit Installation
You’ve done the hard part and your Forester Wilderness is sitting a little taller. But the job isn’t quite finished. Taking the right steps immediately after installation is crucial for safety, performance, and the longevity of your new setup. Think of this as the final chapter of the installation process, ensuring your hard work pays off on the trail. These next steps will help your new components settle in correctly and keep your Subaru running smoothly for years to come.
Why the Break-In Period Is So Important
After installing a lift kit, it's important to allow a break-in period for the suspension components to settle and adjust to the new height. Your suspension has a lot of new parts that need to get acquainted with each other and the vehicle's weight. The best way to do this is to simply drive your Forester. Plan on driving about 50 to 100 miles, taking it easy on varied road surfaces. Avoid any serious off-roading during this time. After you’ve hit that mileage, grab your torque wrench and go back over every nut and bolt you touched during the install. This ensures everything is still tightened to the manufacturer's specifications after the initial settling.
Get a Professional Alignment
This step is non-negotiable. Changing your suspension height alters your vehicle's alignment geometry. Driving with a bad alignment will cause poor handling, unpredictable steering, and rapid, uneven tire wear. As one owner put it, you must make "sure the suspension is not misaligned." Take your Forester to a reputable shop that has experience with lifted vehicles. They’ll adjust the camber, caster, and toe to get your handling dialed in perfectly. Investing in a professional alignment protects your new tires and ensures your Forester is safe and predictable to drive on and off the road. It's a key part of the precision services that keep your vehicle performing at its best.
Your Post-Installation Maintenance Checklist
Your lifted Forester will require a bit more attention than a stock vehicle, but staying on top of it is easy. Regular maintenance checks are crucial to ensure that all components are functioning properly and to catch any potential issues early. After every off-road trip or every few thousand miles, do a quick visual inspection. Look for any leaks around the shocks, check bushings for cracks or excessive wear, and make sure all your hardware is still tight. This proactive approach is the best way to maintain the integrity of your lift kit and your entire overlanding setup, giving you peace of mind when you're far from home.
How to Care for Your Lift Kit Long-Term
A lift kit is an investment, and planning for its long-term care will help you get the most out of it. It's essential to plan for periodic inspections and the potential replacement of wear items. Components like ball joints, bushings, and shocks will eventually wear out, especially if you frequently push your Forester to its limits on the trail. By understanding this from the start, you can budget for future maintenance and avoid surprises. Choosing high-quality performance parts from the beginning can extend the life of your lift, but nothing lasts forever. A little planning goes a long way in keeping your rig trail-ready for countless adventures.
What to Expect from Your Lifted Forester
Once the tools are put away and your Forester is back on all four wheels, the real fun begins. Installing a lift kit is more than just a cosmetic upgrade; it fundamentally changes how your vehicle performs and feels, both on the trail and on your daily commute. You’ll notice a difference right away, from the higher seating position to the way it handles different terrain. Understanding these changes will help you get the most out of your newly modified ride and appreciate the new capabilities you’ve just added.
How Your Off-Road Performance Will Change
This is the number one reason most Forester owners install a lift kit. The most immediate benefit you’ll notice is the increased ground clearance. That extra height means you can clear rocks, ruts, and other obstacles that would have previously stopped you in your tracks. A quality lift kit is one of the core components of any serious overlanding build. It also gives you the room needed to fit larger, more aggressive tires, which provide better traction on loose surfaces like dirt, mud, and sand. With these upgrades, your Forester transforms into a much more capable machine, ready to tackle tougher trails and explore further off the beaten path.
How Will It Handle on the Pavement?
It’s a common concern that lifting your Forester will make it handle poorly on the pavement. While you are raising the vehicle's center of gravity, modern lift kits are engineered to preserve a comfortable and safe on-road driving experience. You won’t have to sacrifice daily drivability for weekend fun. In fact, the upgraded suspension components can often provide a smoother ride over bumps and potholes. The lift also improves your approach and departure angles, which is great for steep trails and surprisingly helpful for navigating steep driveways or parking lot curbs without scraping your bumper. These kits are designed to complement all your other Subaru Forester upgrades.
Potential Changes to Ride Quality
Lifting your Forester will change how it feels on the road, and it’s important to know what to expect. By raising the suspension, you’re altering the vehicle's geometry and center of gravity. A well-designed lift kit, however, is engineered to minimize any negative effects on your daily drive. The goal is to gain significant off-road capability without making major sacrifices in on-road comfort and stability. The components in your kit, especially the shocks and springs, play a huge role in the final ride quality. A quality system will feel controlled and comfortable, while a poorly designed one can feel stiff or floaty. Let's break down two of the most significant changes you might notice.
Understanding Body Roll
One of the most common effects of lifting a vehicle is an increase in body roll. Body roll is that leaning sensation you feel when you take a corner. Because a lift kit raises your Forester’s center of gravity, it can make this lean more noticeable. While some increase is unavoidable, it shouldn't feel unstable or unsafe. High-quality lift kits are designed to manage this change. They often include components like stiffer springs or upgraded sway bars that help control the vehicle's movement during turns. The key is to choose a complete suspension system that accounts for the new ride height, ensuring your Forester remains planted and predictable when you handle corners.
The Role of Shock Absorbers
Your shock absorbers are the single most important component when it comes to ride comfort. They control how your suspension compresses and rebounds over bumps, and their quality will make or break your driving experience after a lift. Cheaping out on shocks can result in a ride that feels either jarringly stiff or unpleasantly bouncy. In contrast, high-quality shocks designed for a lifted vehicle will provide a smooth, controlled ride that absorbs bumps effectively without feeling harsh. They are essential for maintaining stability both on the highway and on rough trails. Investing in a kit with properly valved shocks is crucial for achieving the right balance of off-road performance and on-road comfort.
Do You Need Bigger Tires and Wheels?
With your lift kit installed, you finally have the clearance to run the tires and wheels you’ve been dreaming of. This is where you can truly customize your Forester’s look and capability. The extra space allows you to fit larger all-terrain or mud-terrain tires that can handle serious off-road conditions. For example, a common size upgrade is to a 235/65R17 tire, which offers a great balance of on-road manners and off-road grip. Choosing the right tire is just as important as the lift itself, as it’s your only connection to the ground. Pairing your lift with the right set of tires is a key step in building a complete performance parts package for your vehicle.
How to Maintain Your Lift Kit
Installing your lift kit is a huge win, but the work doesn't stop there. Proper maintenance is what keeps your Forester performing safely and reliably on and off the trail. Think of it as protecting your investment. A little bit of regular attention will ensure your lift kit lasts for years and keeps you ready for any adventure. It’s all about being proactive so you can catch small issues before they become big problems. By staying on top of a few key checks, you ensure every component works together seamlessly, from the suspension to the drivetrain.
Your Regular Inspection Checklist
Getting into the habit of regular inspections is the best thing you can do for your lift kit. After a weekend on the trails or every few months for daily drivers, give your suspension a thorough once-over. Grab a flashlight and check all the lift kit components, including shocks, struts, and springs, for any signs of leaks, damage, or excessive wear. Pay close attention to all the hardware. Make sure every nut and bolt is tight, as vibrations from off-roading can cause things to loosen over time. This simple routine is a core part of keeping your rig ready for all your overlanding solutions and adventures.
How to Spot Early Signs of Wear and Tear
Knowing what to look for makes inspections much more effective. One of the most common issues is leaking shocks or struts—you’ll spot oily residue on the shock body. A leak compromises your ride quality and handling, so it’s a fix you’ll want to make right away. Also, carefully inspect your springs for any cracks or damage. Even a small fracture can lead to a major failure on the trail. Catching these signs of wear early means you can replace a single part instead of dealing with a cascade of problems later. When it's time for a replacement, consider upgrading with higher-quality performance parts to improve durability.
Long-Term Maintenance: The 5,000-Mile Check-In
Your lifted Forester requires a bit more attention than a stock vehicle, and the 5,000-mile mark is a perfect time for a thorough check-in. This routine inspection is crucial for the long-term health of your suspension and your investment. After any demanding off-road trip, or at this mileage interval, take some time to look things over. Get underneath your rig and check that all the hardware is still tight—vibrations can loosen bolts over time. Inspect your shocks for any fluid leaks and look closely at bushings and ball joints for signs of cracking or excessive wear. These components are designed to wear out eventually, especially under heavy use. Catching these issues early helps you plan for replacements and avoid surprises on the trail. When it's time to replace a part, choosing high-quality performance parts ensures your setup remains reliable for future adventures.
Creating a Simple Maintenance Schedule
Consistency is key. Create a maintenance schedule that works for you and stick to it. A good rule of thumb is to perform a detailed inspection every 3,000 to 5,000 miles or after any particularly demanding off-road trip. Your schedule should include checking your lift kit components, steering alignment, and drivetrain parts like your CV joints to ensure everything is functioning as it should. Keeping a log of your checks and any maintenance performed can help you track the health of your vehicle. This proactive approach not only extends the life of your lift kit but also ensures your Forester is always trail-ready and safe for the road. It’s a crucial step in managing all your Subaru Forester upgrades.
Related Articles
Frequently Asked Questions
Will lifting my Forester affect my fuel economy? Yes, you can expect a small drop in your miles per gallon. Raising the vehicle's profile makes it slightly less aerodynamic, and if you add larger, heavier all-terrain tires, that will also contribute to using a bit more fuel. For a typical 2-inch lift, the difference is usually minor and most owners find the trade-off for the added capability is well worth it.
How high should I lift my Forester? For most Forester owners, a lift between 1.5 and 2 inches is the ideal range. This height provides a significant increase in ground clearance and room for larger tires without drastically altering the vehicle's geometry. Going much higher can put excessive strain on components like your CV joints and often requires more extensive modifications to maintain reliability and safe handling.
Do I have to get bigger tires after installing a lift kit? You don't have to change your tires immediately, but fitting larger, more capable tires is one of the primary benefits of a lift. The lift kit provides the necessary clearance to prevent rubbing. While you can continue to run your stock tires, pairing the lift with a good set of all-terrain tires is what truly transforms your Forester's off-road performance and completes the build.
Will a lift kit void my Subaru warranty? This is a common concern, and the short answer is no, a lift kit itself does not automatically void your entire vehicle warranty. Thanks to consumer protection laws, a manufacturer has to prove that the aftermarket part directly caused the failure of a stock component to deny a warranty claim for that specific part. However, it's always a good practice to talk with your dealership's service department beforehand.
Is a spacer lift or a full suspension lift better? It really depends on your budget and how you plan to use your Forester. A spacer lift is a cost-effective way to achieve more height and clear bigger tires, making it a great choice for daily drivers who see moderate trail use. A full suspension lift is a more comprehensive upgrade that replaces components like springs and struts, offering superior off-road handling and performance for those who plan to tackle more demanding terrain regularly.