
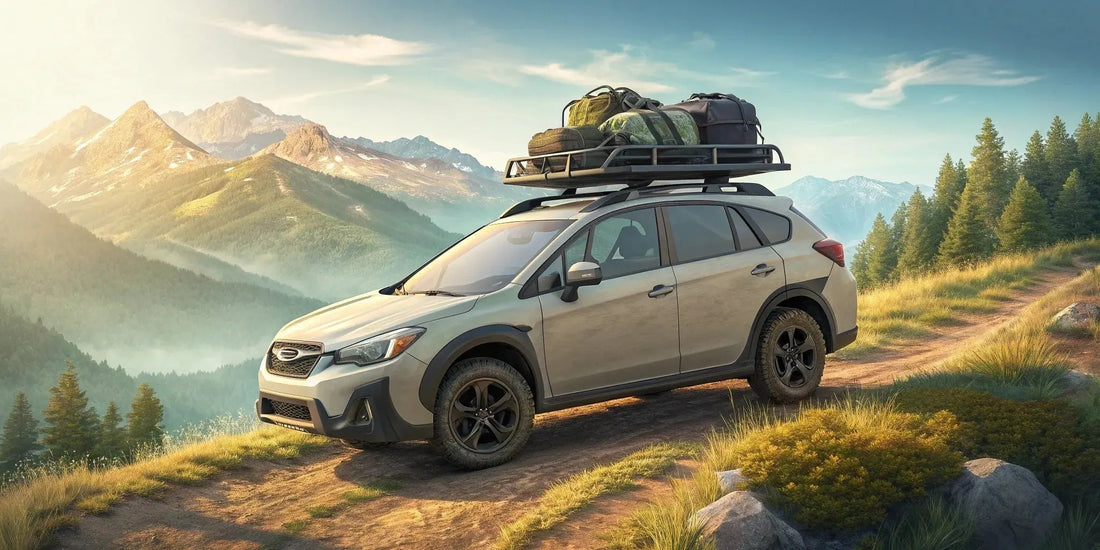
Die 5 besten Crosstrek-Dachgepäckträger für Overlanding-Abenteuer
Ein Dachträger ist mehr als nur ein Zubehörteil; er ist ein wichtiger Bestandteil der Ausrüstung für Offroad-Abenteuer. Einfache Querträger eignen sich zwar für den Transport von Skiern oder einem Kajak, sind aber nicht für die Belastungen eines voll beladenen Fahrzeugs auf unwegsamem Gelände ausgelegt. Ein echtes Overlanding-System transportiert schwere, wichtige Ausrüstung sicher und zuverlässig, auch wenn man fernab der Zivilisation unterwegs ist. Genau das unterscheidet ein Wochenend-Camping-Setup von einem Fahrzeug für echte Expeditionen. Die Wahl des richtigen Crosstrek-Dachträgers für Overlanding-Touren beeinflusst die Geländegängigkeit Ihres Fahrzeugs und Ihre Sicherheit maßgeblich. In diesem Ratgeber erfahren Sie, was einen geländetauglichen Dachträger ausmacht und wie Sie den passenden für sich finden.
Wichtigste Erkenntnisse
- Wählen Sie den passenden Dachträger für Ihre Ausrüstung : Die Funktionalität des Dachträgers sollte Vorrang vor dem Markennamen haben. Achten Sie darauf, dass Tragfähigkeit, Material und modulares Design optimal zu Ihrer Ausrüstung passen, egal ob es sich um ein Dachzelt, Bergungsbretter oder zusätzlichen Kraftstoff handelt.
- Sichere Montage für stabiles Fahrverhalten : Ein Dachträger ist nur so sicher wie seine korrekte Befestigung. Prüfen Sie stets, ob alle Schrauben und Muttern fest angezogen sind und der Träger stabil sitzt. Platzieren Sie schwere Gegenstände beim Beladen tief und mittig, um den Schwerpunkt Ihres Crosstrek zu schützen und ein berechenbares Fahrverhalten im Gelände zu gewährleisten.
- Regelmäßige Kontrollen beugen Problemen vor : Behandeln Sie Ihren Gepäckträger wie jedes andere wichtige Fahrzeugteil. Eine einfache Überprüfung vor Fahrtantritt auf lockere Schrauben, eine kurze Reinigung nach der Tour, um korrosiven Schmutz zu entfernen, und das Ausbessern von Kratzern sorgen dafür, dass Ihr Gepäckträger jahrelang zuverlässig funktioniert.
Warum ein hochwertiger Dachträger alles verändert
Ein Dachträger ist eine der wichtigsten Aufrüstungen für Ihren Crosstrek, insbesondere wenn Sie Offroad-Abenteuer planen. Es geht nicht nur darum, ein Kajak auf dem Dach zu befestigen; ein hochwertiger Träger erweitert die Einsatzmöglichkeiten Ihres Fahrzeugs und macht es zu einem vielseitigen Basislager auf Rädern. Betrachten Sie ihn als Grundlage für Ihre gesamte Abenteuerausrüstung. Ein geeigneter Offroad-Dachträger ist so konstruiert, dass er den Belastungen von unwegsamem Gelände, schwerem Gepäck und unvorhersehbarem Wetter standhält – etwas, das herkömmliche Querträger einfach nicht leisten können.
Das richtige System vergrößert Ihre Staukapazität erheblich und schafft wertvollen Innenraum für Passagiere und wichtige Ausrüstung. Es ermöglicht die sichere Befestigung von allem, vom Dachzelt und der Markise bis hin zu Bergungsausrüstung und zusätzlichem Kraftstoff. Diese sorgfältige Vorbereitung unterscheidet einen Wochenendausflug vom Offroad-Abenteuer. Die Investition in einen robusten, gut durchdachten Dachträger ist ein entscheidender Schritt für ein geländegängiges Fahrzeug. Er gehört zu den wichtigsten Offroad-Lösungen und bietet die nötige Flexibilität und Zuverlässigkeit, wenn Sie weitab von der nächsten Stadt unterwegs sind.
Was sind Gewichtsgrenzen und Tragfähigkeitskennwerte?
Bevor Sie Ihr Fahrzeug beladen, sollten Sie die Gewichtsbeschränkungen beachten. Jedes Fahrzeug hat eine vom Hersteller festgelegte maximale Dachlast – diese finden Sie in der Bedienungsanleitung Ihres Crosstrek. Dieser Wert ist die absolute Obergrenze. Wichtig ist auch der Unterschied zwischen dynamischer und statischer Tragfähigkeit. Die dynamische Tragfähigkeit gibt das maximale Gewicht an, das der Dachträger während der Fahrt tragen kann. Die statische Tragfähigkeit hingegen bezeichnet das Gewicht, das er im geparkten Zustand tragen kann. Dies ist besonders wichtig, wenn Sie ein Dachzelt verwenden möchten. Halten Sie sich immer an die niedrigere der beiden Tragfähigkeiten – die maximale Belastung Ihres Fahrzeugs durch den Dachträger –, um Ihre Sicherheit im Straßenverkehr und abseits der Straße zu gewährleisten.
Unverzichtbare Ausstattungsmerkmale für Overlanding
Beim Kauf eines Gepäckträgers für Offroad-Touren gibt es einige unverzichtbare Merkmale. Achten Sie zunächst auf ein modulares Design. Die besten Gepäckträger verfügen über T-Nuten oder andere vielseitige Befestigungssysteme, mit denen Sie verschiedenstes Zubehör anbringen und Ihren Gepäckträger für jede Reise individuell anpassen können. Zweitens sollten Sie Wert auf Material und Verarbeitungsqualität legen. Die meisten hochwertigen Gepäckträger bestehen aus pulverbeschichtetem Aluminium, da dieses Material robust, leicht und korrosionsbeständig ist. Schließlich ist auch die Aerodynamik wichtig. Ein flacher Gepäckträger, der Windgeräusche reduziert, sorgt nicht nur für angenehmere Fahrten auf der Autobahn, sondern senkt auch Ihren Kraftstoffverbrauch.
Die besten Dachgepäckträgermarken für Ihren Crosstrek
Wenn Sie Ihren Crosstrek für Offroad-Abenteuer ausrüsten möchten, ist der Dachträger eine der wichtigsten Entscheidungen. Er bildet die Grundlage für den Transport von allem, vom Dachzelt bis zur Bergungsausrüstung. Der Markt bietet viele tolle Optionen, doch einige Marken stechen durch Qualität, Design und Zuverlässigkeit immer wieder hervor. Wir stellen Ihnen einige der Top-Kandidaten vor, damit Sie den perfekten Träger für Ihre Abenteuer finden.
Prinsu Design Studio
Prinsu-Dachträger sind bekannt für ihre Robustheit und ihr stilvolles Design. Gefertigt aus hochfestem Aluminium, sind sie für den harten Einsatz konzipiert, sodass Sie sich auch auf unwegsamem Gelände oder bei widrigen Wetterbedingungen keine Sorgen machen müssen. Besonders gefällt mir an Prinsu das flache Design, das sich eng an die Dachlinie schmiegt und nicht nur gut aussieht, sondern auch die Aerodynamik verbessert. Sie bieten eine stabile Plattform für die Montage Ihrer gesamten Ausrüstung und ermöglichen Ihnen maximale Flexibilität ohne Kompromisse bei der Stabilität. Wenn Sie einen robusten und gleichzeitig eleganten Dachträger suchen, ist Prinsu eine hervorragende Wahl, um die Ladekapazität Ihres Crosstrek optimal auszuschöpfen.
Rhino-Rack
Rhino-Rack ist in der Overlanding-Szene ein bekannter Name – und das aus gutem Grund. Ihre Systeme sind für ihre unglaubliche Langlebigkeit und Vielseitigkeit bekannt und daher bei Outdoor-Fans sehr beliebt. Ob Sie Fahrräder für einen Wochenendtrip transportieren, ein Dachzelt für eine Woche in der Wildnis montieren oder einfach nur zusätzliches Gepäck mitnehmen möchten: Rhino-Rack bietet die passende Lösung. Sie bieten eine große Auswahl an Plattformen, Querträgern und Zubehör, mit denen Sie sich genau die Konfiguration zusammenstellen können, die Sie benötigen. Diese Anpassungsfähigkeit macht Rhino-Rack zu einer beliebten Wahl für Crosstrek-Besitzer, die ihr Fahrzeug sowohl im Alltag als auch für anspruchsvolle Offroad-Abenteuer nutzen.
Crawford Performance
Natürlich müssen wir über einen von Subaru-Spezialisten entwickelten Dachträger sprechen. Unser Crawford Performance Dachträger wurde speziell für den Crosstrek entwickelt – mit klarem Fokus auf Leistung und absolute Zuverlässigkeit für Ihre Offroad-Reisen. Wir kennen die Fähigkeiten dieser Fahrzeuge und haben einen Träger gebaut, der diesem Potenzial gerecht wird. Es geht nicht nur um den Transport von Ausrüstung, sondern um ein System, das sich perfekt in Ihr Fahrzeug integriert und den Anforderungen im Gelände standhält. Wenn Sie einen Dachträger benötigen, dem Sie voll und ganz vertrauen können – entwickelt von Menschen, die Subaru leben und lieben –, dann sind unsere Offroad-Lösungen genau das Richtige für Sie.
Spitzenreiter
Wer sein Equipment gerne individuell gestaltet, sollte Front Runner im Auge behalten. Das Unternehmen ist auf modulare Plattformträger spezialisiert, die maximale Kontrolle über die Anordnung der Ausrüstung ermöglichen. Diese Träger werden oft direkt an den werkseitigen Seitenrelingen des Crosstrek befestigt, was die Montage vereinfacht. Der Clou liegt im modularen Design mit T-Nuten über die gesamte Plattform. So lässt sich eine Vielzahl an Halterungen und Zubehör – von Wassertanks bis hin zu Bergungsbrettern – hinzufügen, entfernen und neu anordnen. Für Offroad-Fans, die ein wirklich individuelles und anpassungsfähiges System suchen, bietet Front Runner ein Höchstmaß an Freiheit.
Subaru Werks-Querträger
Manchmal ist die einfachste Lösung die beste. Die originalen Subaru-Querträger sind die offizielle OEM-Option und passen perfekt zu den vorhandenen Dachrelingen Ihres Crosstrek. Sie lassen sich kinderleicht montieren und demontieren und sind daher ideal, wenn Sie keinen permanenten Dachträger benötigen. Zwar sind sie nicht für das extreme Gewicht eines schweren Dachzelts und viel Gepäck ausgelegt, aber perfekt für leichtere Lasten wie Skier, Kajaks oder eine Dachbox. Zudem wurden sie von Subaru so konstruiert, dass sie Windgeräusche minimieren – ein angenehmer Bonus im Alltag. Für eine zuverlässige und unkomplizierte Lösung sind die originalen Querträger ein solider Ausgangspunkt.
Worauf Sie bei einem Gepäckträger für Overlanding-Reisen achten sollten
Die Wahl des richtigen Dachträgers für Ihren Crosstrek ist mehr als nur eine Frage der Optik; es geht darum, eine zuverlässige Basis für Ihre gesamte Offroad-Ausrüstung zu finden. Der richtige Träger transportiert Ihre Ausrüstung sicher über holprige Strecken, hält widrigen Wetterbedingungen stand und lässt sich nahtlos in Ihr übriges Zubehör integrieren. Ein ungeeigneter Träger kann hingegen zu Klappergeräuschen, Rost oder – schlimmer noch – zu einem Totalausfall auf einer einsamen Landstraße führen.
Beim Kauf eines Gepäckträgers stößt man auf eine Vielzahl von Optionen, von einfachen Querträgern bis hin zu kompletten Plattformträgern. Um den Überblick zu behalten, sollte man sich auf die wirklich wichtigen Funktionen für Offroad-Reisen konzentrieren. Überlegen Sie sich, welche Art von Touren Sie planen, welche Ausrüstung Sie transportieren müssen (z. B. Dachzelte, Bergebretter oder zusätzlichen Kraftstoff) und wie viel Sie investieren möchten. Ein stabiler Gepäckträger gehört zu den wichtigsten Ausrüstungsgegenständen für Overlanding-Touren, daher lohnt es sich, gleich beim ersten Mal die richtige Wahl zu treffen. Schauen wir uns die wichtigsten Faktoren genauer an.

Materialien und Verarbeitungsqualität
Ein Dachträger für Offroad-Touren muss robust sein. Er ist speziell dafür ausgelegt, unwegsames Gelände, schwere Lasten und längere Witterungseinflüsse zu überstehen. Die meisten hochwertigen Träger bestehen entweder aus Aluminium oder Stahl. Aluminium ist leicht und von Natur aus korrosionsbeständig, was den Kraftstoffverbrauch senkt und die Lebensdauer verlängert. Stahl ist schwerer, aber extrem stabil, benötigt jedoch eine widerstandsfähige Pulverbeschichtung, um Rost zu verhindern. Achten Sie genau auf die Qualität der Schweißnähte und der mitgelieferten Befestigungsteile. Edelstahlschrauben sind unerlässlich, da sie nicht rosten und sich mit der Zeit nicht festfressen. Ein gut verarbeiteter Träger vermittelt ein solides Gefühl und gibt Ihnen die Gewissheit, dass Ihre Ausrüstung auch auf holprigen Strecken sicher an ihrem Platz bleibt.
Arten von Montagesystemen
Die Art der Befestigung eines Dachträgers an Ihrem Crosstrek ist entscheidend für dessen Stabilität und Festigkeit. Die meisten Crosstreks sind serienmäßig mit Dachreling ausgestattet, und viele Dachträger sind so konstruiert, dass sie direkt daran befestigt werden. Dies ist oft die einfachste Montageart. Für anspruchsvolle Offroad-Touren und schwerere Lasten ist jedoch ein System, das direkt an den werkseitigen Befestigungspunkten auf dem Dach montiert wird, deutlich stabiler. Diese Direktmontagesysteme verteilen das Gewicht gleichmäßiger und bieten eine sicherere Basis für Ihre Ausrüstung. Unabhängig von Ihrer Wahl sollten Sie darauf achten, dass die Befestigungsteile robust und speziell für Ihr Fahrzeug entwickelt wurden, um Beschädigungen am Dach zu vermeiden.
Aerodynamik und Windgeräusche
Seien wir ehrlich: Jede Dachladung beeinflusst den Kraftstoffverbrauch und verursacht Geräusche. Schwere Gegenstände wie Dachzelte erhöhen den Spritverbrauch . Ziel ist es, diese Auswirkungen so gering wie möglich zu halten. Achten Sie auf Dachträger mit flachem Profil und Windabweiser oder -schutz an der Vorderseite. Diese Merkmale sorgen für einen gleichmäßigen Luftstrom über den Träger und Ihre Ausrüstung und reduzieren so das störende Pfeifen bei Autobahngeschwindigkeit deutlich. Eine ruhigere und kraftstoffsparende Fahrt macht lange Touren zum Ausgangspunkt der Wanderung viel angenehmer.
Zubehörkompatibilität
Ein hochwertiger Dachträger für Offroad-Touren ist eine modulare Plattform für Ihre gesamte Ausrüstung. Überlegen Sie sich vor dem Kauf, was Sie transportieren möchten. Benötigen Sie ein Dachzelt, eine Markise, Bergungsbretter oder zusätzliche Kraftstoff- und Wasserkanister? Viele moderne Dachträger verfügen über T-Nut-Systeme, mit denen Sie eine Vielzahl von Zubehörteilen einfach anbringen können. Halterungen für RotopaX-Behälter, abschließbare Boxen und sogar ein Reserverad sind sinnvolle Ergänzungen für einen Dachträger. Die Wahl eines Dachträgers mit einem vielseitigen und weit verbreiteten Montagesystem gibt Ihnen die Flexibilität, Ihren Crosstrek je nach Bedarf individuell auszustatten.
Witterungsbeständigkeit
Ihr Dachträger ist im Freien montiert und muss daher allen Witterungsbedingungen standhalten. Hochwertige Träger werden aus Materialien wie hochfestem Aluminium gefertigt und sind so konstruiert, dass sie jedem Gelände und jeder Wetterlage trotzen . Eine robuste Pulverbeschichtung schützt vor Regen, Schnee und Sonne und verhindert Rost und Ausbleichen. Dies ist besonders wichtig für Stahlträger. Mit einem wetterbeständigen Träger stellen Sie sicher, dass er Ihnen über Jahre hinweg bei Ihren Abenteuern zuverlässig zur Seite steht, ohne dass Sie sich Sorgen um Korrosion machen müssen.
Was kostet ein guter Dachträger?
Sprechen wir über das Budget. Die Preise für Dachträger können stark variieren, und wie viel Sie ausgeben, hängt ganz von Ihren Bedürfnissen ab. Betrachten Sie es wie jedes andere Tuningteil für Ihren Crosstrek – Sie investieren in Funktionalität. Eine einfache Lösung für gelegentliche Wochenendausflüge ist günstiger als eine robuste Plattform für ein Dachzelt und einen Monat autarkes Reisen. Der Preis spiegelt in der Regel die verwendeten Materialien, die Verarbeitungsqualität, die Tragfähigkeit und die Anzahl der montierbaren Zubehörteile wider. Wir unterteilen die Preise in drei Kategorien, damit Sie herausfinden können, was Ihren Bedürfnissen und Ihrem Budget entspricht. Es geht darum, die Ausrüstung an Ihre Ziele anzupassen, egal ob Sie ein Kajak zum See transportieren oder für eine anspruchsvolle Expedition in die Wildnis packen.
Einsteiger-Racks (200-500 US-Dollar)
Wenn Sie gerade erst mit Overlanding anfangen oder eine einfache Lösung für den Transport von Skiern oder einer Dachbox suchen, ist die Einsteigerklasse ein idealer Ausgangspunkt. In dieser Preisklasse finden Sie hauptsächlich Querträgersysteme, die an der werkseitigen Dachreling Ihres Crosstrek befestigt werden. Ein perfektes Beispiel ist das Subaru Aero Style Querträgerset , eine solide und zuverlässige Wahl für leichtere Lasten. Diese Träger sind unkompliziert, einfach zu montieren und erfüllen ihren Zweck ohne große finanzielle Belastung – ideal also für Gelegenheitsabenteurer.
Systeme der Mittelklasse (500-900 US-Dollar)
Bereit für ernsthaftere Abenteuer? Mittelklasse-Systeme bieten einen deutlichen Sprung in Sachen Robustheit und Vielseitigkeit. Hier finden Sie Plattformträger aus widerstandsfähigeren Materialien wie Aluminium mit höherer Traglast und deutlich mehr Modularität. Marken wie Prinsu bieten in dieser Preisklasse hervorragende Dachträger für den Crosstrek an. Diese Systeme sind ideal für alle, die schwerere Ausrüstung wie Dachzelte, Bergebretter und zusätzlichen Kraftstoff transportieren müssen. Sie bilden eine solide Basis für ein wirklich geländegängiges Offroad-Fahrzeug, ohne gleich zu den teuersten Optionen auf dem Markt greifen zu müssen.
Premium-Setups (ab 900 $)
Für ambitionierte Offroad-Reisende, die höchste Leistung und Zuverlässigkeit erwarten, sind Premium-Dachträger die beste Wahl. Diese High-End-Systeme sind für härteste Bedingungen konzipiert. Sie erhalten erstklassige Materialien, präzise Verarbeitung und Funktionen, die für extreme Beanspruchung entwickelt wurden. Der Prinsu-Dachträger für den Crosstrek der zweiten Generation ist ein hervorragendes Beispiel: Er ist aus hochfestem Aluminium gefertigt und trägt selbst schwere Lasten. Dachträger dieser Kategorie bieten oft die beste Kompatibilität mit Zubehör und eine optimale Aerodynamik. Sie investieren in die Geländegängigkeit Ihres Fahrzeugs und geben Ihnen Sicherheit auf abgelegenen Offroad-Strecken.
Vergessen Sie diese zusätzlichen Kosten nicht
Wenn Sie ein Budget für Ihren neuen Dachträger festlegen, denken Sie daran, dass der Träger selbst nur der Anfang ist. Sie müssen auch jegliches Zubehör berücksichtigen, das Sie anbringen möchten, wie z. B. Halterungen für Markisen, Beleuchtung oder Bergungsausrüstung. Auch die Versandkosten können den Endpreis erhöhen, insbesondere bei größeren Plattformträgern. Wenn Sie sich die Montage nicht selbst zutrauen, kalkulieren Sie die Kosten für die professionelle Montage ein. Um den Kauf zu erleichtern, bieten viele Händler Finanzierungsmöglichkeiten an, mit denen Sie Ihre Ausrüstung in Raten bezahlen können, damit Ihr Abenteuer schneller beginnen kann.
So montieren Sie Ihren Crosstrek-Dachträger
Sobald Sie den perfekten Dachträger ausgewählt haben, steht Ihrem nächsten Abenteuer nur noch die Montage nichts mehr im Wege. Keine Sorge – das ist in der Regel unkompliziert und lässt sich problemlos selbst in Ihrer Einfahrt erledigen. Wichtig ist, sich Zeit zu nehmen und auf die Details zu achten, damit alles sicher für die bevorstehende Fahrt ist. Wir gehen die wichtigsten Schritte gemeinsam durch, vom Zusammenstellen des Werkzeugs bis hin zur abschließenden, entscheidenden Sicherheitsprüfung.
Benötigte Werkzeuge
Für diese Montage benötigen Sie keinen riesigen Werkzeugkasten. Die meisten Dachträger-Sets sind für eine einfache Installation konzipiert und enthalten oft das wichtigste Werkzeug, in der Regel einen Inbusschlüssel. Es ist jedoch ratsam, einige weitere grundlegende Werkzeuge griffbereit zu haben. Je nach den im Set enthaltenen Teilen benötigen Sie möglicherweise auch einen Schraubendreher oder einen Sechskantschlüssel , um alle Schrauben festzuziehen. Legen Sie vor Beginn der Montage alle Teile bereit und lesen Sie die Anleitung durch, um sicherzustellen, dass Sie alles Notwendige in Reichweite haben.
Selbstmontage vs. professionelle Installation
Für die meisten ist die Montage eines Dachträgers ein durchaus machbares Heimwerkerprojekt . Die mitgelieferte Anleitung ist dabei Ihr bester Ratgeber, befolgen Sie sie also genau. Solange Sie mit einfachem Werkzeug umgehen können, schaffen Sie das selbst – eventuell mit etwas Hilfe beim Anheben des Trägers. Wenn Sie sich jedoch unsicher fühlen oder einfach die Sicherheit eines Fachmanns bevorzugen, ist die Montage durch eine Fachwerkstatt selbstverständlich eine gute Option. Ein Fachbetrieb in Ihrer Nähe montiert den Träger sicher und schnell, sodass Sie im Handumdrehen wieder unterwegs sind.
Vermeiden Sie diese häufigen Installationsfehler
Der wichtigste Schritt bei der Montage ist die sichere Befestigung des Dachträgers. Ein häufiger Fehler ist, nicht zu überprüfen, ob die Querträger fest auf der Dachreling sitzen . Nachdem Sie sie angebracht haben, drücken und ziehen Sie kräftig daran. Wenn sie Spiel haben, sind sie nicht fest genug. Ein weiterer Fehler ist, zu schnell zu arbeiten und nicht alle Schrauben und Muttern gemäß den Herstellervorgaben festzuziehen. Locker befestigte Teile können auf der Autobahn zu Klappergeräuschen oder, schlimmer noch, zu einer verrutschenden Ladung auf unebenen Strecken führen. Überprüfen Sie daher jede einzelne Schraube, bevor Sie die Montage als abgeschlossen betrachten.
Führen Sie diese abschließenden Sicherheitsprüfungen durch.
Bevor du dein Gepäck verlädst und losfährst, ist ein letzter Sicherheitscheck unerlässlich. Dieser Schritt dauert nur eine Minute, ist aber entscheidend. Gehe zu jeder Ecke des Gepäckträgers und versuche, ihn zu bewegen. Fass die Querträger an den Verbindungsstellen zu den Seitenschienen an und rüttele kräftig daran. Sie sollten sich wie ein fester Bestandteil deines Crosstrek anfühlen und sich kein bisschen bewegen. Sobald du dich vergewissert hast, dass alles fest sitzt und sicher ist, kannst du offiziell mit der Planung deiner nächsten Offroad-Reise beginnen.
Holen Sie das Beste aus Ihrem neuen Dachgepäckträger heraus
Die Montage eines Dachträgers auf Ihrem Crosstrek ist ein wichtiger Schritt, um sein volles Offroad-Potenzial auszuschöpfen. Der Träger selbst ist jedoch nur die Basis. Um Ihre Investition optimal zu nutzen, sollten Sie sich gut überlegen, wie Sie ihn beladen, was Sie daran befestigen und wie Sie alles organisieren. Eine gut geplante Konfiguration ermöglicht es Ihnen nicht nur, mehr Ausrüstung mitzunehmen, sondern verbessert auch die Sicherheit und das Fahrverhalten Ihres Fahrzeugs im Gelände. Betrachten Sie Ihren Dachträger als vielseitige Plattform, die Sie für jedes Abenteuer individuell anpassen können.
Der Schlüssel liegt darin, ein System zu entwickeln, das zu Ihnen passt. Das bedeutet, das Gewicht Ihrer Ausrüstung, die Art von Zubehör, das Ihre Reisen erleichtert, und die sichere und griffbereite Aufbewahrung aller Gegenstände zu berücksichtigen. Ein wenig Planung vor dem Beladen kann Ihnen viel Ärger auf dem Campingplatz oder auf anspruchsvollen Strecken ersparen. Durch eine optimale Konfiguration stellen Sie sicher, dass Ihre Ausrüstung geschützt ist, Ihr Crosstrek stabil bleibt und Sie alles Notwendige genau dann finden, wenn Sie es brauchen. Wir zeigen Ihnen Schritt für Schritt, wie Sie Ihren neuen Dachträger in die ultimative Abenteuerzentrale verwandeln.
Gewicht verteilen wie ein Profi
Das Fahrverhalten und die Stabilität Ihres Crosstrek hängen maßgeblich von seinem Schwerpunkt ab. Durch das Beladen mit einem Dachgepäckträger wird der Schwerpunkt angehoben, daher ist die Gewichtsverteilung entscheidend. Generell gilt: Platzieren Sie die schwersten Gegenstände im Fahrzeug oder so tief und mittig wie möglich auf dem Gepäckträger. Sperrige, aber leichtere Ausrüstung wie Schlafsäcke, Zelte und Campingstühle eignet sich ideal für das Dach. Diese Vorgehensweise minimiert die Seitenneigung in Kurven und sorgt dafür, dass Ihr Subaru auch auf unebenem Gelände sicher liegt. Beachten Sie stets die zulässigen Traglasten Ihres Fahrzeugs und Ihres Gepäckträgers, um Ihre Sicherheit zu gewährleisten.
Unverzichtbares Zubehör für Ihre nächste Reise
Mit dem richtigen Zubehör verwandeln Sie Ihren Dachträger von einer einfachen Transportmöglichkeit in ein modulares, multifunktionales Werkzeug. Beginnen Sie mit den wichtigsten Dingen, die zu Ihrem Reisestil passen. Bergungsbretter wie Maxtrax sind unverzichtbar, um sich aus festgefahrenen Situationen zu befreien. Die Montage am Dachträger sorgt dafür, dass sie nicht im Weg sind, aber dennoch schnell griffbereit. Kraftstoff- oder Wasserkanister, beispielsweise von Rotopax, sind eine weitere sinnvolle Ergänzung, um Ihre Reichweite zu erhöhen. Für die sichere Aufbewahrung anderer Ausrüstung empfehlen wir abschließbare Hartschalenkoffer, die wertvolle Gegenstände vor Witterungseinflüssen und Diebstahl schützen. Mit diesen Lösungen für Offroad-Reisen können Sie sich ein Setup zusammenstellen, das perfekt auf Ihre Bedürfnisse zugeschnitten ist.
Ergänzen Sie Ihre Einrichtung mit Beleuchtung
Offroad-Abenteuer enden nicht mit Sonnenuntergang. Die Integration von Beleuchtung in Ihre Dachgepäckträger-Ausrüstung revolutioniert die Navigation bei Nacht und den Komfort auf dem Campingplatz. Ein nach vorne gerichteter LED-Lichtbalken leuchtet den Weg weit über die Reichweite Ihrer Scheinwerfer hinaus aus, während kleinere Zusatzscheinwerfer an den Seiten oder am Heck eine 360-Grad-Beleuchtung für den Lageraufbau oder Reparaturen in der Nacht bieten. Viele moderne Dachgepäckträger verfügen über Kanäle und Befestigungspunkte, die die Installation von Offroad-Scheinwerfern vereinfachen und eine saubere Kabelführung ermöglichen – für eine professionell aussehende und hochfunktionale Ausrüstung.
Organisieren Sie Ihre Ausrüstung mit intelligenten Aufbewahrungslösungen
Ein gut organisierter Dachgepäckträger macht jede Reise angenehmer. Anstatt einfach lose Gegenstände festzuzurren, verwenden Sie ein System mit speziellen Aufbewahrungsmöglichkeiten. Wetterfeste Reisetaschen und Hartschalen-Dachboxen eignen sich hervorragend, um Kleidung, Kochutensilien und andere Ausrüstung sauber, trocken und sicher zu verstauen. Mehrere kleinere Boxen anstelle einer großen verbessern die Gewichtsverteilung und erleichtern das Finden bestimmter Gegenstände, ohne alles auspacken zu müssen. Ein gutes Gepäcknetz ist ebenfalls unverzichtbar, um sperrige Gegenstände wie Brennholz oder Campingstühle zu sichern und ein Verrutschen während der Fahrt zu verhindern.
Halten Sie Ihren Dachgepäckträger in Topform
Ihr Dachgepäckträger ist mehr als nur ein Stauraum für Ausrüstung – er ist ein unverzichtbares Ausrüstungsteil, das Ihre wichtigsten Dinge durch unwegsames Gelände transportiert. Wie jedes andere Bauteil Ihres Crosstrek benötigt er regelmäßige Wartung, um zuverlässig und sicher zu bleiben. Wer ihn einfach montiert und dann vergisst, riskiert lockere Schrauben, Rost oder sogar einen Ausfall, wenn er kilometerweit von der nächsten Stadt entfernt ist. Nehmen Sie sich vor und nach jeder Reise ein paar Minuten Zeit, um Ihren Gepäckträger zu überprüfen und zu warten. So schützen Sie Ihre Investition und stellen sicher, dass er für Ihr nächstes Abenteuer bereit ist. Betrachten Sie es als vorbeugende Wartung für ein beruhigendes Gefühl auf der Straße.
Ihre Checkliste für regelmäßige Inspektionen
Overlanding-Dachträger sind zwar für harte Bedingungen ausgelegt, doch Vibrationen auf holprigen Straßen und die ständige Einwirkung von Witterungseinflüssen können ihnen zusetzen. Führen Sie daher vor Ihrer Abreise eine kurze Inspektion durch. Machen Sie es sich zur Gewohnheit, genauso wie den Reifendruck zu prüfen. Kontrollieren Sie zunächst alle Befestigungsteile. Fassen Sie jeden Befestigungsfuß an und stellen Sie sicher, dass er fest sitzt und keine Spiel hat. Prüfen Sie außerdem, ob alle Muttern und Schrauben fest angezogen sind. Werfen Sie anschließend einen genauen Blick auf den gesamten Dachträger und achten Sie dabei auf Anzeichen von Belastung, Rissen oder Verformungen im Rahmen, insbesondere an den Schweißpunkten. Vergessen Sie nicht, auch das Dach Ihres Fahrzeugs zu überprüfen, auf dem der Dachträger montiert ist, um sicherzustellen, dass keine Schäden vorhanden sind. Ein kleines Problem in der Einfahrt zu entdecken ist immer besser, als sich mit einem großen Problem unterwegs auseinandersetzen zu müssen.
Schützen Sie es vor Witterungseinflüssen.
Ihr Dachgepäckträger ist im Freien ständig Sonne, Regen, Schlamm und Streusalz ausgesetzt. Mit der Zeit können diese Einflüsse die Beschichtung angreifen und das darunterliegende Metall beschädigen. Am einfachsten schützen Sie ihn durch regelmäßige Reinigung. Ein kurzes Abwaschen nach jeder Fahrt entfernt korrosive Stoffe wie Salz und Schlamm, die die Beschichtung des Trägers angreifen können. Bei einem pulverbeschichteten Träger, der aufgrund seiner Langlebigkeit häufig verwendet wird, können Sie ihn mit einem UV-Schutzspray oder Wachs behandeln, um Ausbleichen und Kreiden durch Sonneneinstrahlung zu verhindern. Dieser einfache Schritt sorgt dafür, dass Ihr Träger lange wie neu aussieht und bietet zusätzlichen Schutz vor Witterungseinflüssen – so ist Ihre Ausrüstung für Offroad-Abenteuer besonders langlebig.
Rost und Verschleiß verhindern
Selbst die widerstandsfähigsten Pulverbeschichtungen und Lackierungen können durch Äste oder Schaltvorgänge beschädigt werden. Dadurch entsteht eine Eintrittspforte für Rost, insbesondere bei Stahlträgern. Halten Sie eine kleine Flasche Ausbesserungslack bereit, um Abplatzungen oder tiefe Kratzer sofort zu versiegeln. Diese kleine Maßnahme verhindert, dass aus einem kleinen Makel ein ernsthaftes Rostproblem wird. Achten Sie außerdem auf die Befestigung Ihres Zubehörs. Ständige Reibung durch das am Träger reibende Zubehör kann die Beschichtung abnutzen. Verwenden Sie Gummipads oder Rohrisolierung an den Befestigungsklemmen, um eine Schutzschicht zu schaffen. Die Investition in hochwertige Crosstrek-Upgrades, die speziell für Ihr System entwickelt wurden, kann den Verschleiß durch schlecht sitzendes Zubehör ebenfalls reduzieren.
Überwachen Sie die Leistung im Laufe der Zeit
Ein Dachgepäckträger kann das Fahrgefühl und den Klang Ihres Fahrzeugs verändern. Achten Sie daher auf seine Funktionsfähigkeit im Laufe der Zeit. Wenn Sie auf der Autobahn neue Pfeif- oder Klappergeräusche hören, deutet dies oft darauf hin, dass sich eine Schraube gelöst oder ein Zubehörteil verschoben hat. Ignorieren Sie dies nicht – halten Sie an und suchen Sie nach der Ursache. Achten Sie außerdem auf Ihre Ladung. Auch wenn es verlockend ist, die maximale Tragfähigkeit Ihres Gepäckträgers auszureizen, kann dies zu vorzeitigem Verschleiß führen und das Fahrverhalten Ihres Crosstrek beeinträchtigen. Überprüfen Sie daher regelmäßig, was Sie transportieren und wie es befestigt ist. Ein gut gewarteter und korrekt beladener Gepäckträger sollte Sie auf Ihren Abenteuern zuverlässig begleiten und nicht stören.
Verwandte Artikel
Häufig gestellte Fragen
Kann ich wirklich ein Dachzelt auf meinem Crosstrek montieren? Absolut. Der Crosstrek eignet sich hervorragend für ein Dachzelt, aber man muss dabei mit Bedacht vorgehen. Wichtig ist, die zulässige statische Tragfähigkeit sowohl des Fahrzeugs als auch des gewählten Dachträgers genau zu beachten. Die statische Tragfähigkeit, also das Gewicht, das das Fahrzeug im geparkten Zustand tragen kann, ist immer deutlich höher als die dynamische Tragfähigkeit während der Fahrt. Ein stabiler Plattformträger ist hierfür unerlässlich, da er das Gewicht des Zeltes und der Insassen auf mehrere Befestigungspunkte verteilt. Prüfen Sie unbedingt vorher in der Bedienungsanleitung Ihres Crosstrek die spezifischen Dachlastgrenzen.
Brauche ich einen kompletten Dachträger oder reichen Querträger? Das hängt ganz von Ihren Bedürfnissen ab. Wenn Sie nur ein Kajak, Skier oder eine Dachbox für einen Wochenendtrip transportieren möchten, sind Querträger völlig ausreichend. Sie sind einfach und effektiv für leichtere Lasten. Planen Sie hingegen ein anspruchsvolles Offroad-Fahrzeug, ist ein kompletter Dachträger die beste Wahl. Er bietet die nötige Stabilität und Flexibilität, um ein Dachzelt, eine Markise, Bergungsausrüstung und zusätzlichen Kraftstoff sicher zu montieren und Ihr Dach in ein funktionales und gut organisiertes Basislager zu verwandeln.
Beeinträchtigt ein Dachgepäckträger tatsächlich meinen Spritverbrauch? Ja, alles, was Sie außen an Ihrem Auto anbringen, erzeugt Luftwiderstand und wirkt sich auf den Kraftstoffverbrauch aus. Wie stark sich das auswirkt, hängt von der Konstruktion des Gepäckträgers und der transportierten Ladung ab. Ein schlanker, flacher Gepäckträger mit Windabweiser hat im leeren Zustand nur einen minimalen Einfluss. Sobald Sie ihn jedoch mit einem Dachzelt oder sperriger Ausrüstung beladen, werden Sie den Unterschied an der Zapfsäule deutlich bemerken. Das ist einfach der Preis für die zusätzlichen Transportmöglichkeiten.
Kann ich meinen Dachträger dauerhaft montiert lassen? Die meisten hochwertigen Offroad-Dachträger bestehen aus korrosionsbeständigen Materialien wie pulverbeschichtetem Aluminium und sind für den dauerhaften Einsatz auf dem Fahrzeug konzipiert. Sie sind so konstruiert, dass sie Sonne, Regen und allen anderen Belastungen im Gelände standhalten. Wenn Sie Ihren Crosstrek im Alltag nutzen und sich Sorgen um die etwas höhere Windgeräuschentwicklung oder den Kraftstoffverbrauch machen, sollten Sie ein einfacheres Querträgersystem in Betracht ziehen, das sich bei Bedarf leichter abnehmen lässt.
Welches Zubehör sollte ich mir neben dem Gepäckträger als Erstes zulegen? Wenn du mit deinem Crosstrek auf anspruchsvollen Offroad-Strecken unterwegs sein willst, sind Bergungsbretter und die passenden Halterungen für deinen Gepäckträger eine hervorragende Investition. Sie gehören zu den effektivsten Ausrüstungsgegenständen für die Selbstbergung und sind durch die Montage am Gepäckträger sicher und griffbereit, wenn du sie am dringendsten brauchst. Ein praktischer erster Schritt, der dir sofort mehr Sicherheit und ein besseres Gefühl für dein Fahrzeug gibt.